

What are Calibrations?
Calibrations help you ensure consistency between AI-powered evaluations and human quality assurance reviews. By comparing how the AI scores conversations against how your team scores them, you can:
Fine-tune your Playbooks to better reflect your quality standards
Identify training opportunities when reviewers consistently disagree with the AI
Ensure consistency across your QA team through group calibration sessions
Build confidence in your AI scoring accuracy
How It Works
Four step workflow:
The system automatically samples conversations based on your configuration
Your calibrators (QA managers/team leads) review and score these conversations
The system compares calibrator scores with AI scores to identify discrepancies
You use these insights to improve your playbooks and training
Getting Started
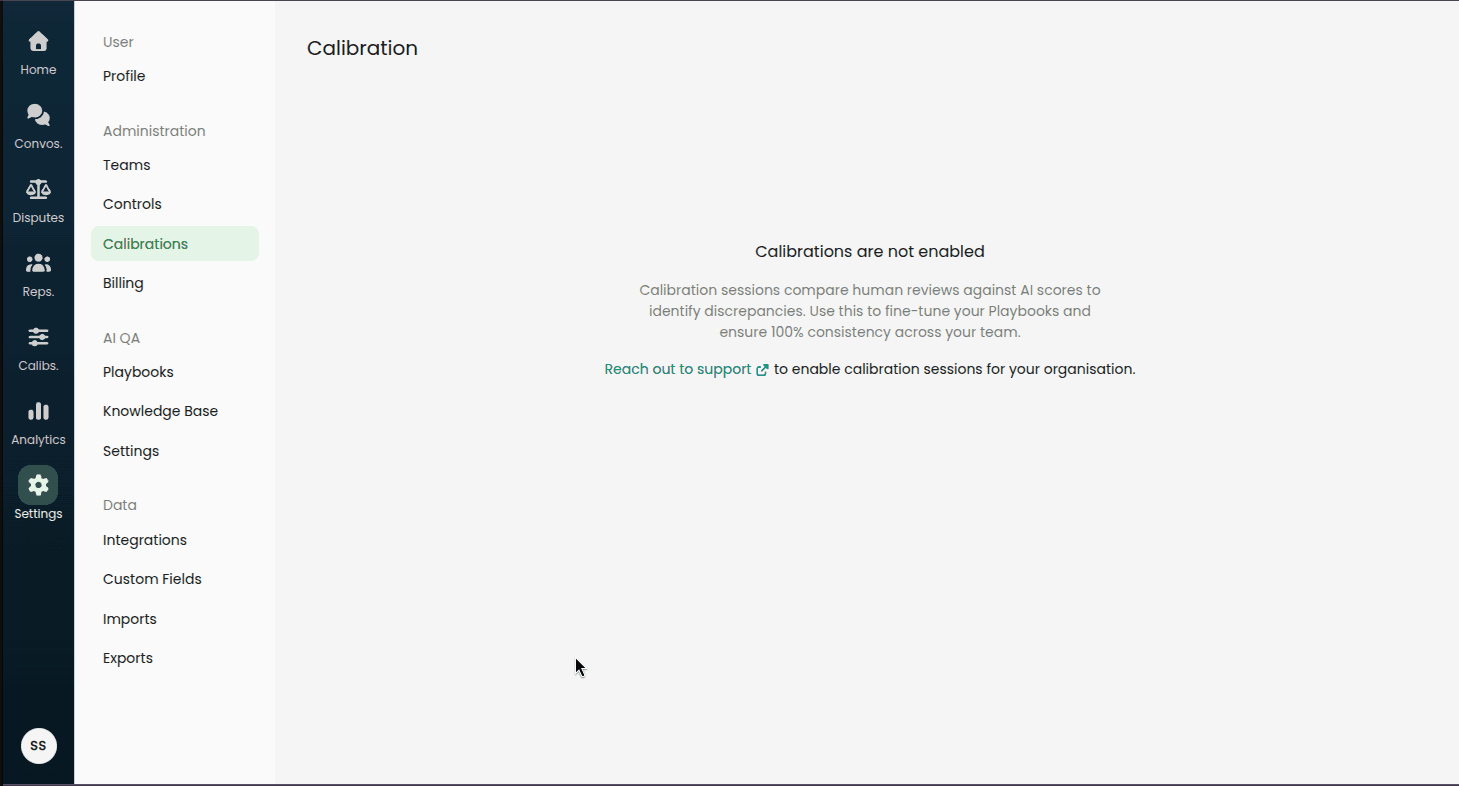
Enabling Calibrations
Calibrations must be enabled for your organization. If you see "Calibrations are not enabled" when visiting the Calibration settings page, reach out to support to enable this feature.
Prerequisites
Before you start with calibrations:
Ensure you have active Playbooks configured
Ensure that you have conversations audited by the AI before enabling calibration session scheduling.
Identify team members who will act as calibrators (typically QA managers or team leads)
Decide on your sampling strategy (how many conversations, how often)
Configuring Calibration Settings
Navigate to Settings > Calibrations to configure how calibrations work for your organization.
![IMAGE_PLACEHOLDER: Screenshot showing navigation path to Settings > Calibrations]
Sampling Configuration
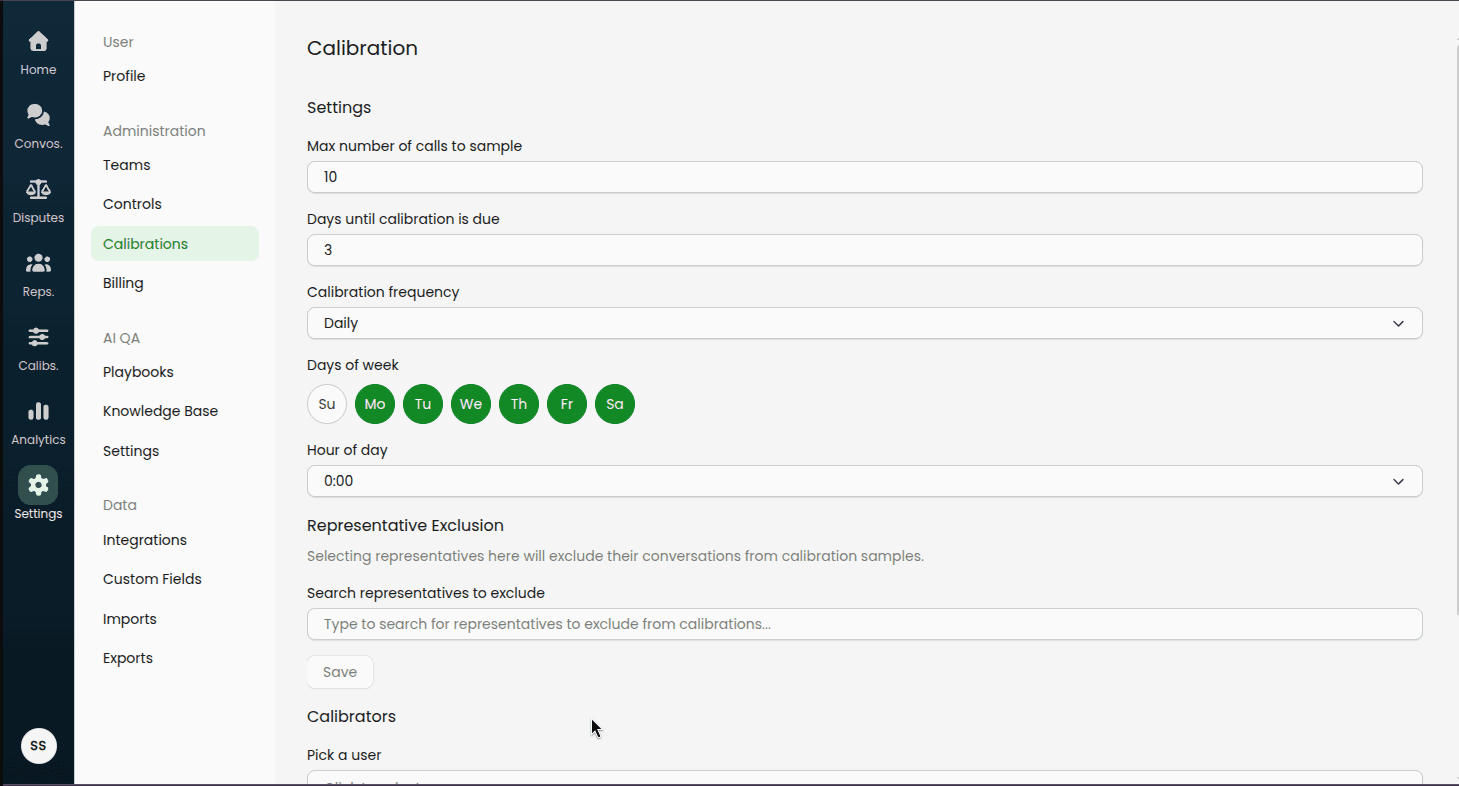
Max Number of Calls to Sample
Set the maximum number of conversations that will be included in each calibration session.
Recommended: Start with 5-10 conversations per session to ensure calibrators can complete reviews in a reasonable time.
Days Until Calibration is Due
Configure how long calibrators have to complete their reviews after a session is created.
Example: Setting this to 3 days means calibrators have 3 days from the session creation date to complete their reviews.
Calibration Frequency
Choose how often calibration sessions are automatically created:
Daily: Sessions created on selected weekdays (e.g., Monday through Friday)
Weekly: Sessions created on a specific day of the week (e.g., every Monday)
Day of Week Selection
When you select a frequency, you'll choose which day(s) sessions are created:
Daily frequency: Select multiple weekdays (e.g., Monday, Tuesday, Wednesday, Thursday, Friday)
Weekly frequency: Select one day (e.g., Monday)
Hour of Day (Optional)
Specify what time of day (in your organization's timezone) the calibration session should be created.
Representative Exclusion
Exclude specific representatives (agents) whose conversations you don't want included in calibration samples. This is useful for:
New team members still in training
Representatives in special programs or pilots
Representatives handling sensitive or unusual cases
To exclude a representative:
Type their name in the search field
Click on their name from the results
They'll appear in the "Excluded representatives" list
To remove an exclusion: Click the "Remove" button next to their name in the excluded list.
Managing Calibrators
Calibrators are the team members who will review conversations and provide scores. Typically, these are QA managers, team leads, or experienced representatives.
To add a calibrator:
Click the "Pick a user" dropdown
Search for and select the user
They'll be added to the calibrators list
Note: Users marked as "Disabled from calibrations" were previously calibrators but have been removed from the role. Their historical calibration data is preserved.
Performing Calibrations
Once calibration sessions are configured and created, calibrators need to review and audit conversations.
Accessing Calibration Sessions
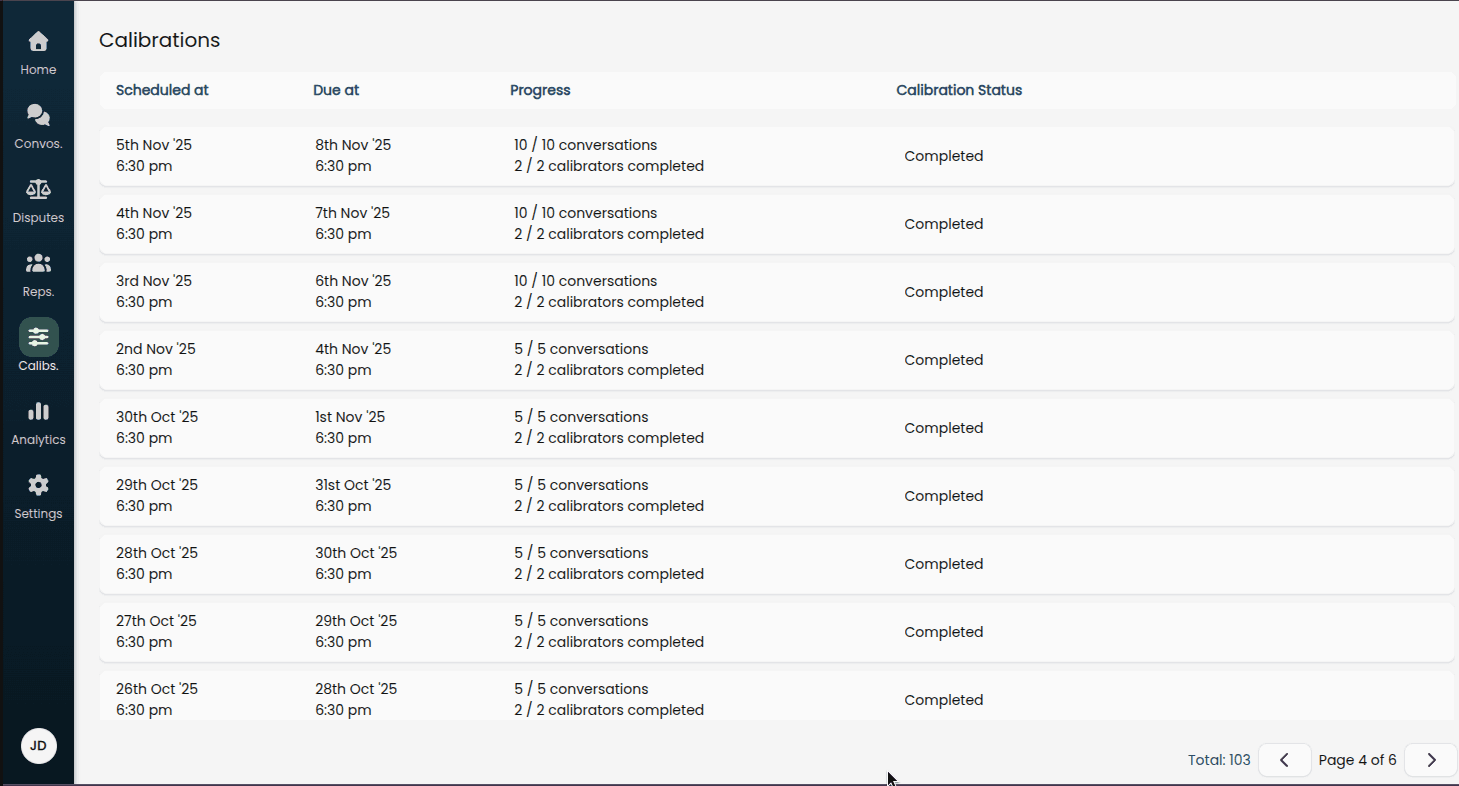
Navigate to Calibrations in the main menu to see all active and past calibration sessions.
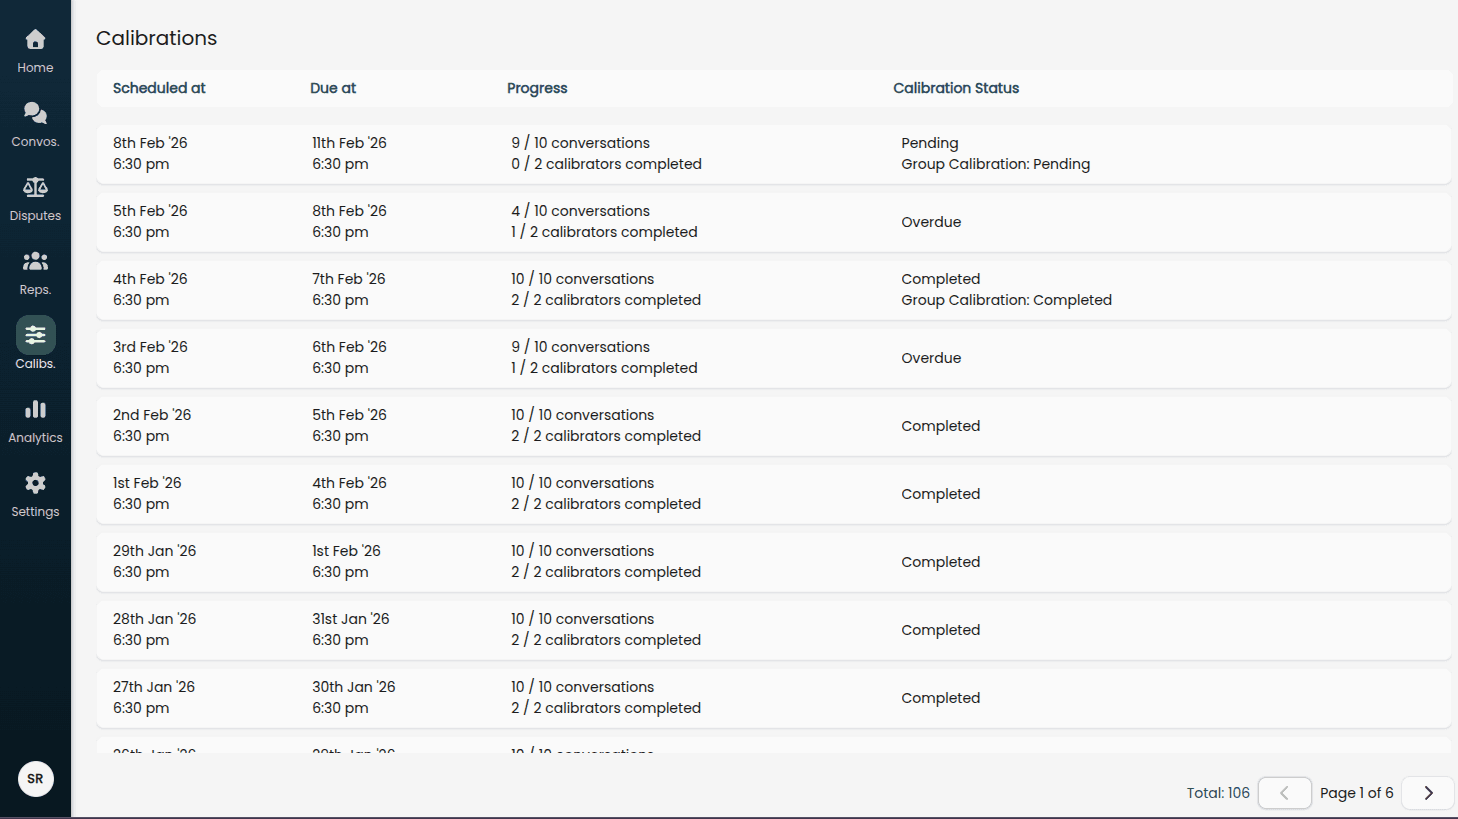
Session Status:
Pending: Sessions that haven't been completed yet (shown with yellow indicator)
Completed: All calibrators have submitted their audits (shown with green indicator)
Reviewing Conversations
Click on a calibration session to see the list of conversations that need to be audited.
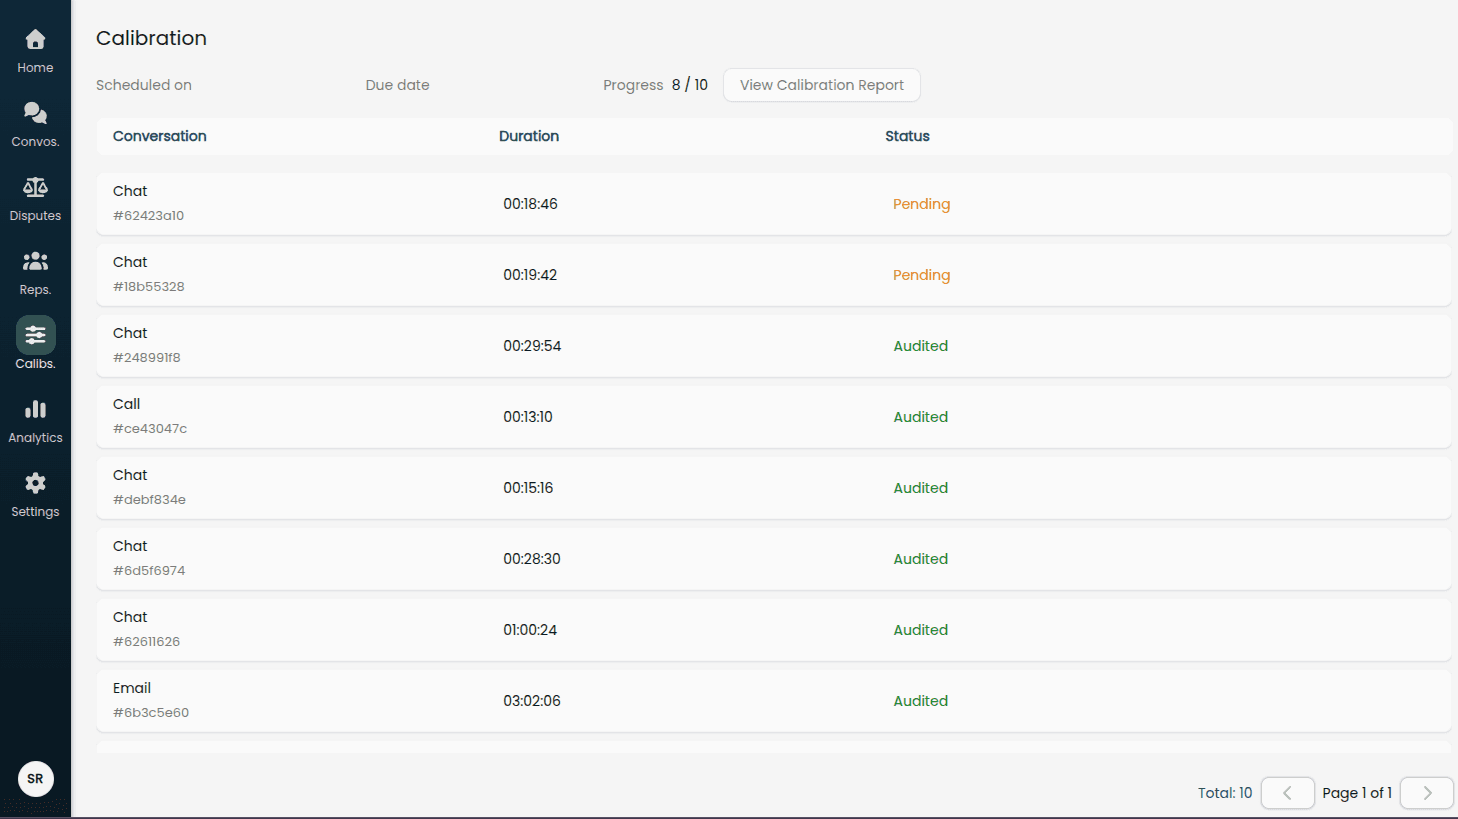
For each conversation:
Click on the conversation title to open the review interface
The left side shows the conversation transcript and recording (if available)
The right side shows the playbook audit form
Submitting Audits
For each conversation, you'll audit it against all configured playbooks:
Review the Conversation
Read through the transcript carefully
Listen to the recording if available (for call conversations)
Reference any tags or custom fields that provide context
Evaluate Each Criterion
For each criterion in the playbook:
Select a value from the dropdown (Yes/No/N/A if enabled)
Add remarks if required:
Remarks are mandatory when selecting a value that differs from the "correct" answer (the one worth more points)
Remarks are optional otherwise but recommended for clarity
The audit is saved automatically as you make selections
Criterion Scoring:
Each criterion displays its point values (e.g., "Yes (5 pts)" or "No (0 pts)")
Fatal criteria are marked with "(Fatal)" instead of point values
N/A options appear only if enabled for that criterion
Submit the Complete Audit
Once you've evaluated all criteria for all playbooks:
Verify all dropdowns show selections (no "Pending" values)
Ensure remarks are provided where mandatory
Click the Submit Audit button
The Submit Audit button will be disabled until all criteria have been evaluated.
Undoing an Audit
If you need to revise an audit after submission:
Click the Undo Audit button (appears after submission)
Confirm the action in the modal
Your previous selections and remarks will be preserved
Make any necessary changes
Click Submit Audit again
Note: Undoing an audit removes it from the calibration results but retains your work so you can modify and resubmit without starting over.
Completing the Session
Continue auditing conversations until all conversations in the session have been reviewed. You can:
Complete them in any order
Save progress and return later (individual criteria selections are auto-saved)
Track your progress on the session overview page
Once all calibrators have submitted audits for all conversations, the session is marked as complete and the calibration report becomes available.
Understanding the Calibration Report
Access calibration reports by navigating to Calibrations in the main menu, then clicking on a specific calibration session.
Report Overview
At the top of the report, you'll see:
Scheduled on: When the calibration session was created
Due date: When calibrators need to complete their reviews
The Calibration Table
The report displays a comprehensive table showing:
Structure
Rows: Each conversation in the calibration sample
Column Groups:
Playbook Score (overall)
Individual criteria from your playbooks
Sub-columns:
AI evaluation
Each calibrator's evaluation
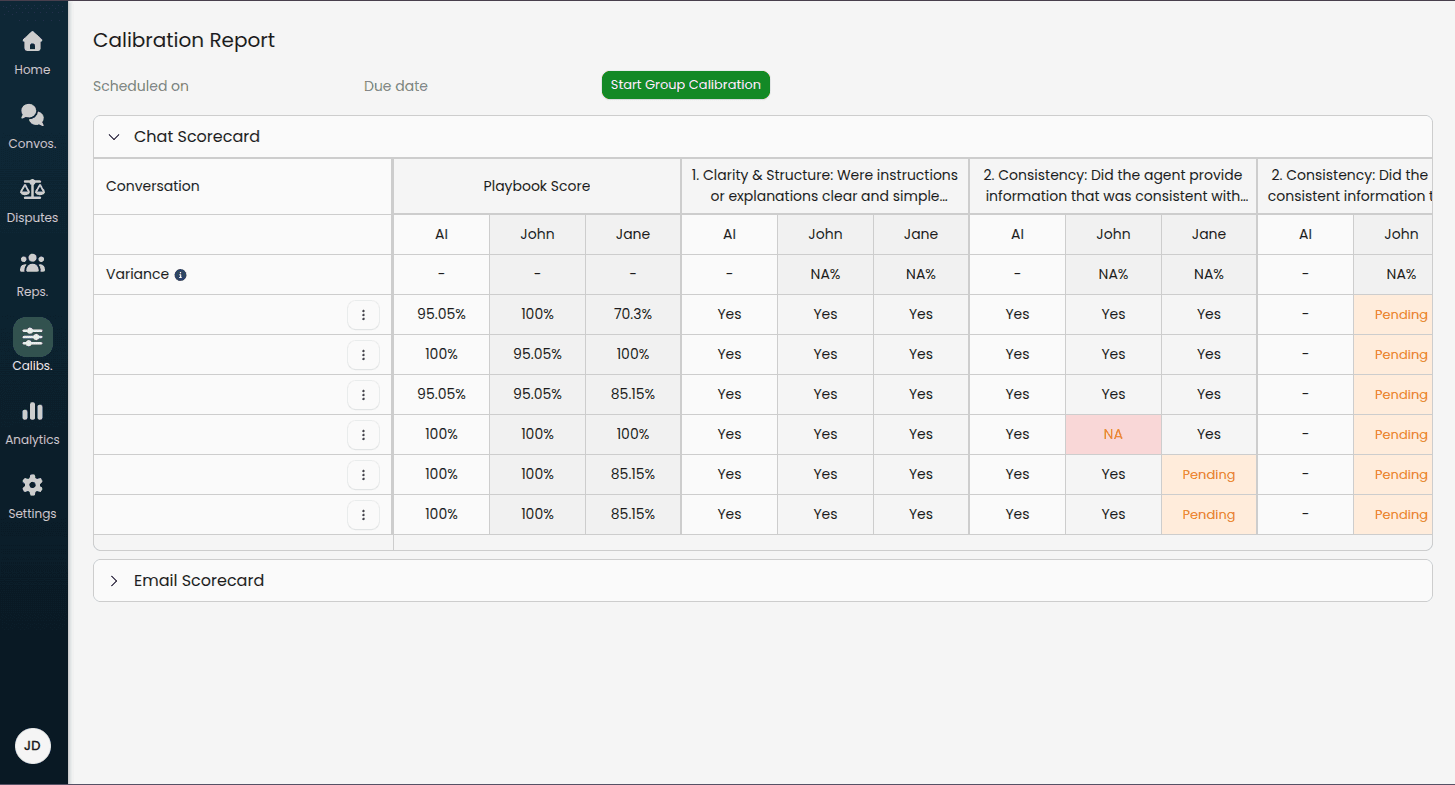
Reading the Table
Conversation Column
Click any conversation title to open it in a new tab and review the full details
Use the three-dot menu to add conversations to test cases. More about playbook test cases here.
Playbook Score Columns
AI column: The overall score calculated by the AI
Calibrator columns: Overall scores given by each calibrator
Scores are displayed as percentages (0-100%)
Criteria Columns Each criterion in your playbook gets its own column group:
AI column: The value assigned by the AI (e.g., Yes, No, Partial, N/A)
Calibrator columns: Values assigned by each calibrator
Understanding Variance
Variance Row
Below each criterion header, you'll see a variance percentage for each calibrator. This shows how often that calibrator disagrees with the AI for that specific criterion.
Example: If a calibrator has 25% variance on a criterion, they disagreed with the AI on 1 out of 4 conversations.
Color Coding:
Green/Low variance (0-10%): Excellent agreement between calibrator and AI
Yellow/Medium variance (10-30%): Some disagreement; may indicate training needs or playbook refinement opportunities
Red/High variance (30%+): Significant disagreement; requires attention
Deviation Highlighting
Individual cells where a calibrator disagrees with the AI are highlighted:
Red/Pink background: Calibrator's evaluation differs from the AI's evaluation
Yellow background: Calibrator hasn't completed this evaluation yet (shows "Pending")
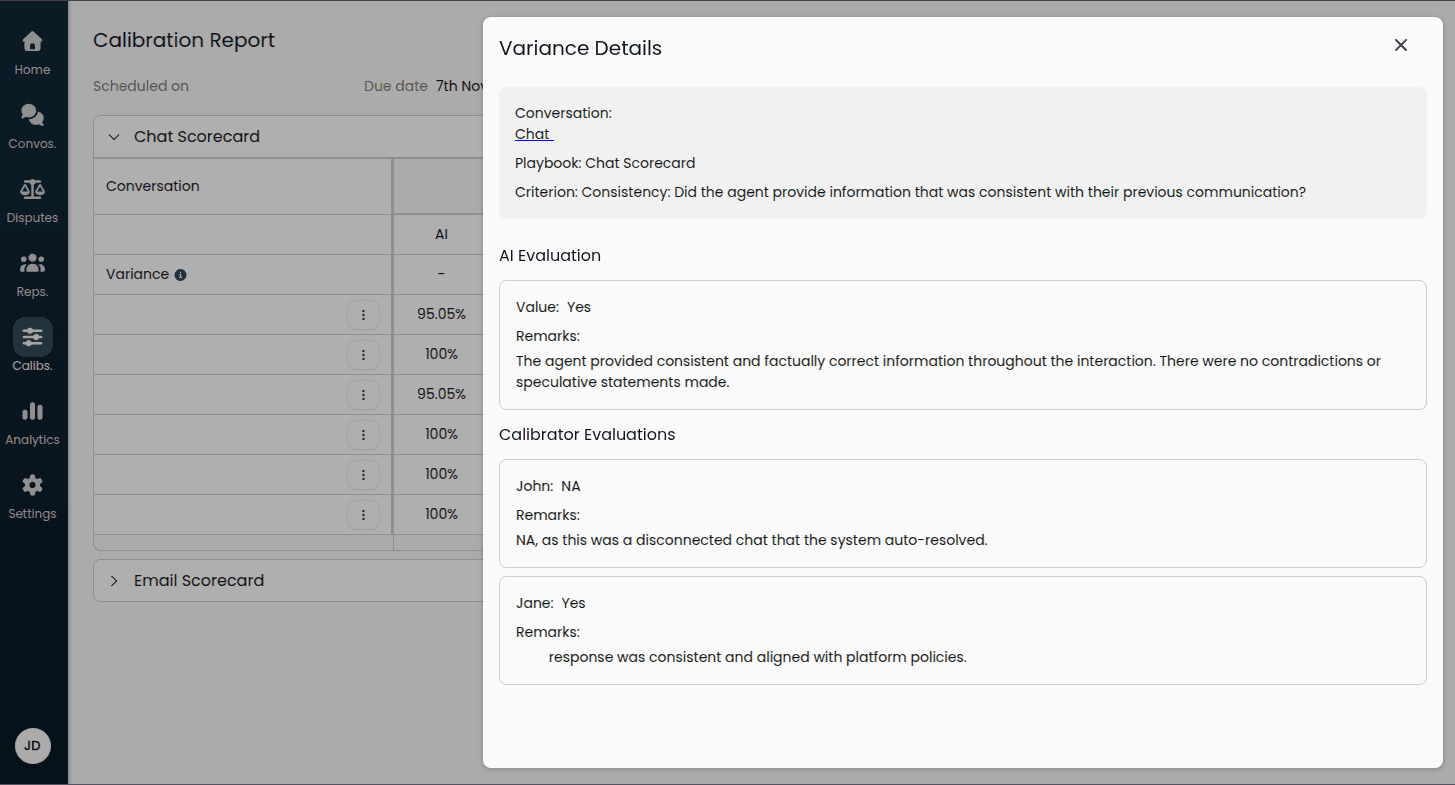
Viewing Cell Details
Click on any cell in the table to see detailed information:
Conversation details with a link to review
Playbook and criterion name
AI evaluation and any remarks
Each calibrator's evaluation and remarks
This is especially helpful for understanding:
Why there's a variance (different interpretation, edge case, etc.)
The reasoning behind each evaluation through remarks
Whether playbook criteria need clarification
Next Steps
Now that you understand the basics of calibrations, continue with: Advanced Features
You can learn about about:
Running group calibration sessions
Tracking performance through analytics
Best practices for maintaining an effective calibration program